
To connect a portable generator to a house, plug the generator cord into the 20- or 30-amp outlet, and then connect the opposite end to household outlets using additional extension cords. This allows for safe indoor use of the generator.
Connecting a portable generator to your house provides an efficient backup power solution during emergencies or when you’re off the grid. But how exactly can you connect a generator to your home’s electrical system? In this guide, we’ll explore the steps you need to follow to safely and effectively connect a portable generator to your house.
By following these instructions, you can ensure a seamless power supply to your essential appliances and electrical devices when you need them most. Let’s dive in and learn how to connect a portable generator to your house.
1. Understanding The Power Requirements
To connect a portable generator to your house, start by plugging the generator cord into the appropriate outlet. Then, use extension cords to connect to household outlets indoors for additional power. It’s a simple and safe way to provide power during emergencies or when you’re off the grid.
1. Determine Your Power Needs:
To connect a portable generator to your house, the first step is to understand your power requirements. This will help you determine the size and capacity of the generator you need. Here’s how you can determine your power needs:
- Make a list of all the appliances and devices you want to run during a power outage.
- Identify the wattage requirement for each appliance. This information can usually be found on the appliance’s label or in the user manual.
- Add up the wattage requirements for all the appliances to get the total power needed.
2. Calculate The Wattage Requirements:
Once you have a list of the appliances and their wattage requirements, calculating the total wattage needed is crucial. Here’s how you can do it:
- Convert the wattage of all appliances to kilowatts by dividing by 1000.
- Sum up the kilowatt values to get the total power requirement.
3. Identify Essential And Non-Essential Appliances:
To ensure that you have enough power to run essential appliances during a power outage, it’s important to distinguish between essential and non-essential appliances. Here’s how you can do it:
- Essential appliances are those that are necessary for your basic needs, such as refrigerators, heating systems, medical equipment, and lights.
- Non-essential appliances are those that are not critical for your immediate needs, such as TVs, gaming consoles, and decorative lights.
By identifying essential and non-essential appliances, you can prioritize power usage during an outage and ensure that you have enough power for the most important devices.
Remember, understanding your power requirements is crucial for safely and efficiently connecting a portable generator to your house. By determining your power needs, calculating the wattage requirements, and identifying essential and non-essential appliances, you can make informed decisions and ensure that your generator meets your power needs during emergencies.
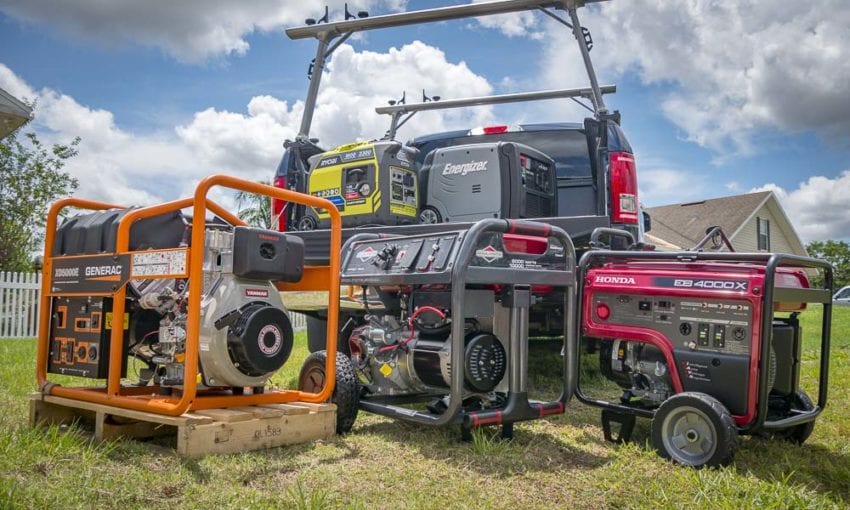
2. Selecting The Right Generator
To connect a portable generator to your house, plug the generator cord into the outlet on your generator and connect the other end to your household outlets using extension cords. This allows you to safely power your home during an outage.
1. Assess The Generator Capacity Needed:
- Consider the power requirements of your house and the appliances you want to power during an outage.
- Calculate the wattage needed for each appliance and add them up to determine the total capacity required.
- Look for a generator that can handle the total wattage needed without overloading.
2. Consider Fuel Options (Gasoline, Propane, Dual Fuel):
- Gasoline: Portable generators running on gasoline are widely available and offer ease of refueling. However, gasoline has a shorter shelf life and can be volatile.
- Propane: Propane generators are cleaner and more environmentally friendly. Propane is also readily available and has a longer shelf life compared to gasoline.
- Dual Fuel: Some generators offer the option to run on both gasoline and propane, providing flexibility and convenience.
3. Evaluate Noise Levels And Portability:
- Noise Levels: Consider the noise level of the generator, especially if you live in a residential area with noise regulations. Look for generators that offer quiet operation.
- Portability: Assess the weight and size of the generator. If you plan to move it frequently or take it on camping trips, a compact and lightweight model would be more suitable.
Remember, when connecting a portable generator to your house, safety should always be a priority. Follow manufacturer instructions, use proper cables and connectors, and consult a professional if you are unsure about any aspect of the installation process.
3. Ensuring Safety Precautions
Learn how to safely connect a portable generator to your house by following these guidelines. Start by plugging the generator into the appropriate outlet, then connect additional extension cords indoors to power your household appliances. Ensure safety precautions are taken throughout the process for a secure connection.
1. Familiarize Yourself With The Generator Manual
- Read and understand the manual that comes with your portable generator. It contains important information regarding the specific installation and usage guidelines for your particular model.
2. Follow Recommended Installation And Operation Guidelines
- Adhere to the instructions provided by the generator manufacturer to ensure safe installation and proper operation.
- Avoid improvising or taking shortcuts during the installation process.
- Follow the step-by-step instructions to connect the generator to your house’s electrical system correctly.
3. Implement Proper Grounding And Electrical Safety Measures
- Grounding your generator is essential to protect against electrical shock and ensure safe operation.
- Consult the generator manual or an electrician to determine the specific grounding requirements for your generator.
- Install a transfer switch to prevent back-feeding of power into the utility lines, which can pose a danger to utility workers.
- Use heavy-duty extension cords that are designed for outdoor use and can handle the electrical load of your generator.
- Avoid overloading the generator by calculating the total wattage of the appliances and devices you plan to power.
Remember, the safety precautions outlined in the generator manual should always be followed to ensure a safe and reliable connection between your portable generator and house.
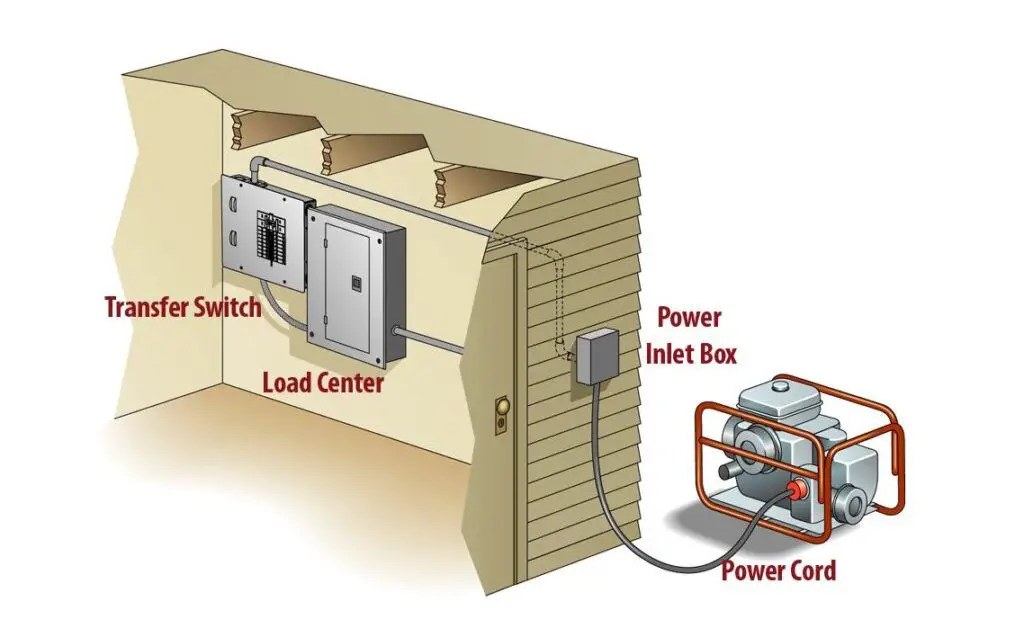
4. Installing An Interlock Kit
When it comes to connecting a portable generator to your house, installing an interlock kit is a vital step. It allows you to safely and easily switch between utility power and generator power, ensuring a seamless transition during power outages.
1. Understand The Purpose And Benefits Of An Interlock Kit:
- An interlock kit is a safety device that allows you to safely connect a portable generator to your house’s electrical system.
- It prevents backfeeding, which can be dangerous for utility workers and potentially damage your generator.
- The interlock kit ensures that only one power source (either the utility or the generator) is active at a time.
- It provides a simple and effective way to switch between utility power and generator power without the need for manual wiring changes.
- The interlock kit is a cost-effective alternative to installing a separate transfer switch.
2. Review The Installation Process Step-By-Step:
- Determine the location: Choose a suitable location for the interlock kit near your electrical panel. Ensure that it is easily accessible and complies with the building codes in your area.
- Shut off the main power: Before starting the installation process, make sure to shut off the main power to your electrical panel. This step ensures safety during the installation.
- Mount the interlock kit: Attach the interlock kit to your electrical panel according to the provided instructions. Ensure that it is securely mounted and aligned correctly.
- Install the interlock switch: Connect the interlock switch to the main breaker of your electrical panel. This switch allows you to manually switch between utility power and generator power.
- Connect the generator inlet box: Install a generator inlet box outside your house, near the generator location. This box serves as the connection point for the generator.
- Run the wiring: Connect the generator inlet box to the interlock switch using appropriate electrical wiring. Follow the guidelines provided by the manufacturer to ensure proper wiring installation.
- Test the interlock system: Once the installation is complete, test the interlock system to ensure its proper functioning. Switch between utility power and generator power to verify that the system works correctly.
- Ensure compliance with local building codes: Before using the interlock kit, ensure that the installation meets all the requirements and codes specified by your local authorities. This step is crucial for the safety and legality of the setup.
Please note that the installation process may vary depending on the specific interlock kit and electrical panel configuration. Always refer to the manufacturer’s instructions for accurate installation guidance.
Remember to prioritize safety during the entire installation process. If you’re unsure about any step, it’s recommended to consult a professional electrician.
5. Connecting The Generator To The Transfer Switch
To connect a portable generator to your house, simply plug the generator cord into the appropriate outlet on the generator. Then, split the opposite end into multiple household outlets and connect additional extension cords indoors for a safe and reliable power supply.
When it comes to connecting your portable generator to your house, the transfer switch plays a vital role in safely and efficiently directing power. Here are the steps to connect the generator to the transfer switch:
- Determine the optimal location for the transfer switch:
- Choose a location near your main electrical panel for easy access.
- Ensure there is enough space for the transfer switch and proper ventilation.
- Avoid areas prone to flooding or extreme temperatures.
- Install the transfer switch correctly:
- Turn off the main power supply to the house to avoid any accidents.
- Mount the transfer switch on the wall or a suitable surface.
- Connect the switch to the main electrical panel using appropriate wires.
- Make sure all connections are secure and follow the manufacturer’s instructions.
- Test the transfer switch functionality:
- Turn off all appliances and electrical devices in the house.
- Start the generator and let it run for a few minutes to stabilize.
- Switch the transfer switch to the generator position.
- Power should now flow from the generator to the house.
- Turn on a few essential devices to ensure they receive power.
- Switch the transfer switch back to the utility position.
- Verify that power is restored from the main electrical supply.
Remember to follow the manufacturer’s guidelines and consult a professional electrician if needed. Connecting the generator to the transfer switch correctly ensures a safe and reliable source of backup power for your house.
6. Running Wiring From Generator To House
To connect a portable generator to your house, start by plugging the generator cord into the 20- or 30-amp outlet on the generator. Then, you can safely connect additional extension cords indoors to power your household outlets. It’s an easy and efficient way to ensure power during emergencies or outages.
1. Choose The Appropriate Wiring Method (Extension Cords, Transfer Panel, Inlet Box):
- Extension Cords:
- Using heavy-duty extension cords suitable for outdoor use ensures safe and reliable power transmission.
- Make sure to choose cords with a gauge appropriate for the power output of your generator.
- Connect the cords directly to the generator and plug them into the desired appliances in your house.
- Transfer Panel:
- A transfer panel allows for a more permanent and convenient connection between the generator and your house.
- It is installed next to your electrical panel and acts as a bridge between the generator and your home’s electrical system.
- The generator is connected to the transfer panel via a dedicated power cord, and the panel is then linked to the circuits you want to power during an outage.
- Inlet Box:
- An inlet box is another option for connecting your generator to your house.
- It provides a safe and efficient way to transfer power without the need for extension cords.
- The inlet box is installed on an exterior wall of your house and is connected to your electrical panel through a dedicated power cord.
- When the generator is running, you can simply plug it into the inlet box, allowing power to flow directly into your house.
2. Install Wiring Safely And Efficiently:
- Plan the Wiring Route:
- Before installing the wiring, map out the route from your generator to your house.
- Consider any obstacles, such as trees or fences, and ensure the wiring will be protected from damage.
- Choose the most direct path to minimize the length of wire needed.
- Use Proper Wiring and Connectors:
- Select wiring and connectors that are suitable for outdoor use and capable of handling the generator’s power output.
- Use approved electrical connectors and follow the manufacturer’s instructions for proper installation.
- Make sure all connections are secure and tight to avoid any loose or exposed wires.
- Grounding:
- Proper grounding is essential for safety when connecting a generator to your house.
- Consult a qualified electrician to ensure that your generator and the wiring are properly grounded to prevent electrical shocks and other hazards.
3. Verify The Proper Connection Between The Generator And House:
- Test the Power Supply:
- After connecting the generator to your house, test the power supply to ensure that electricity is flowing smoothly.
- Check each circuit and verify that the appliances connected to them are receiving power.
- If there are any issues, double-check the connections and consult an electrician if necessary.
- Perform Regular Maintenance:
- To ensure the ongoing reliability of your generator connection, perform regular maintenance checks.
- Inspect the wiring, connectors, and inlet box (if applicable) for any signs of wear or damage.
- Clean and maintain the generator according to the manufacturer’s instructions.
Remember to follow all safety guidelines provided by the generator manufacturer and consult a qualified electrician if you have any doubts or concerns during the installation process. A properly installed and maintained generator connection will provide you with peace of mind during power outages.
7. Starting And Operating The Generator
To connect a portable generator to your house, start by plugging the generator cord into the appropriate outlet on the generator. Then, use extension cords to connect the generator to the household outlets inside your home, ensuring a safe and efficient power supply.
1. Follow The Startup Sequence:
- Make sure the generator is in a well-ventilated area and away from flammable materials.
- Check the oil level and add oil if necessary.
- Connect the generator to the house using the appropriate transfer switch or interlock device.
- Turn off all appliances and circuits in the house to avoid overload.
- Start the generator by following the manufacturer’s instructions and using the pull or electric start.
- Allow the generator to warm up for a few minutes before applying any load.
- Slowly turn on the circuits and appliances in the house, starting with the most essential ones.
2. Monitor The Generator For Optimal Performance:
- Keep an eye on the generator’s fuel level to ensure it doesn’t run out.
- Check the generator’s gauges and indicators regularly to monitor voltage, frequency, and other performance factors.
- Listen for any unusual noises or vibrations that could indicate a problem.
- Keep an eye on the generator’s temperature to prevent overheating.
- Monitor the generator’s run time and schedule regular breaks to prevent excessive wear and tear.
- Be aware of any warning lights or error messages and consult the generator’s manual or a professional if necessary.
3. Understand Maintenance And Troubleshooting Procedures:
- Familiarize yourself with the generator’s maintenance schedule and perform regular maintenance tasks as recommended.
- Keep the generator clean and free of debris to prevent clogging and overheating.
- Check and replace the generator’s air filter regularly to ensure proper airflow.
- Change the generator’s oil and spark plug according to the manufacturer’s instructions.
- If the generator fails to start or experiences other issues, consult the troubleshooting section of the manual.
- Understand the different types of generator problems and how to address them, such as low voltage, high voltage, or no power output.
- If you are unsure about any maintenance or troubleshooting procedures, seek professional help to avoid damaging the generator or causing injury.
By following the startup sequence, monitoring the generator for optimal performance, and understanding maintenance and troubleshooting procedures, you can connect a portable generator to your house safely and effectively. Remember to always prioritize safety and consult the generator’s manual or a professional if you have any questions or concerns.
8. Shutting Down And Disconnecting The Generator
To properly connect a portable generator to your house, make sure to follow the necessary steps to shut it down and disconnect it safely. This will ensure a smooth and safe transition from generator power back to your regular electrical supply.
1. Safely Turn Off The Generator:
- Turn off all appliances and lights powered by the generator before shutting it down.
- Locate the generator’s power switch and turn it to the “Off” position.
- Let the generator run without any load for a few minutes to cool down before shutting it off completely.
- Once the generator is cooled down, turn off the fuel valve to stop the flow of fuel to the engine.
- Allow the generator to run for a few more minutes until it completely stops.
2. Disconnect The Generator From The Transfer Switch:
- Locate the transfer switch connected to your main electrical panel.
- Make sure the main breaker in the transfer switch is in the “Off” position.
- Disconnect the power cord or cable from the generator to the transfer switch.
- Inspect the connection to ensure there are no signs of damage or loose wires.
- Securely cap the generator’s outlets to prevent dust or debris from entering.
3. Store The Generator And Related Equipment Properly:
- Choose a dry and well-ventilated storage area for the generator.
- Clean the generator thoroughly before storing it to remove any dirt or debris.
- Drain the fuel from the generator to prevent any fuel-related issues during storage.
- Disconnect the battery if your generator has one, and store it separately.
- Store any cords or cables neatly to prevent tangles and damage.
Remember, safety should always be a priority when shutting down and disconnecting a portable generator. Following these steps will help ensure a smooth and safe process.
Credit: www.protoolreviews.com
Frequently Asked Questions On How To Connect Portable Generator To House?
1. How Do You Hook Up A Portable Generator To A Whole House?
To connect a portable generator to a whole house, plug the generator cord into the 20- or 30-amp outlet. Then, use extension cords to connect household outlets indoors.
2. Can You Plug A Generator Directly Into Your House?
Yes, you can connect a generator to your house by plugging it into a 20- or 30-amp outlet on the generator and using extension cords to safely connect it to household outlets indoors.
3. How Do You Hook Up A Portable Generator To A House Without A Transfer?
To connect a portable generator to a house without a transfer switch, plug the generator cord into the outlet on the generator. Then, use extension cords to connect the generator to household outlets inside the house.
Conclusion
Connecting a portable generator to your house, is as simple as plugging the generator cord into the appropriate outlet on your generator. From there, you can use extension cords to safely connect your generator to various household outlets indoors.
This allows you to power essential appliances and electronics during a power outage or in remote areas where access to electricity is limited. When connecting your generator to your house, it is important to follow proper safety guidelines and ensure that you have the necessary equipment, such as interlock switches or transfer switches, to prevent backfeeding and protect against electrical hazards.
By understanding the proper steps and taking the necessary precautions, you can easily and safely connect your portable generator to your house. This provides you with a reliable backup power source and peace of mind knowing that you can keep your home running smoothly during unexpected power outages.
So, whether you’re facing a storm, camping in the wilderness, or simply need a backup power solution, connecting a portable generator to your house is a practical and convenient option.


