
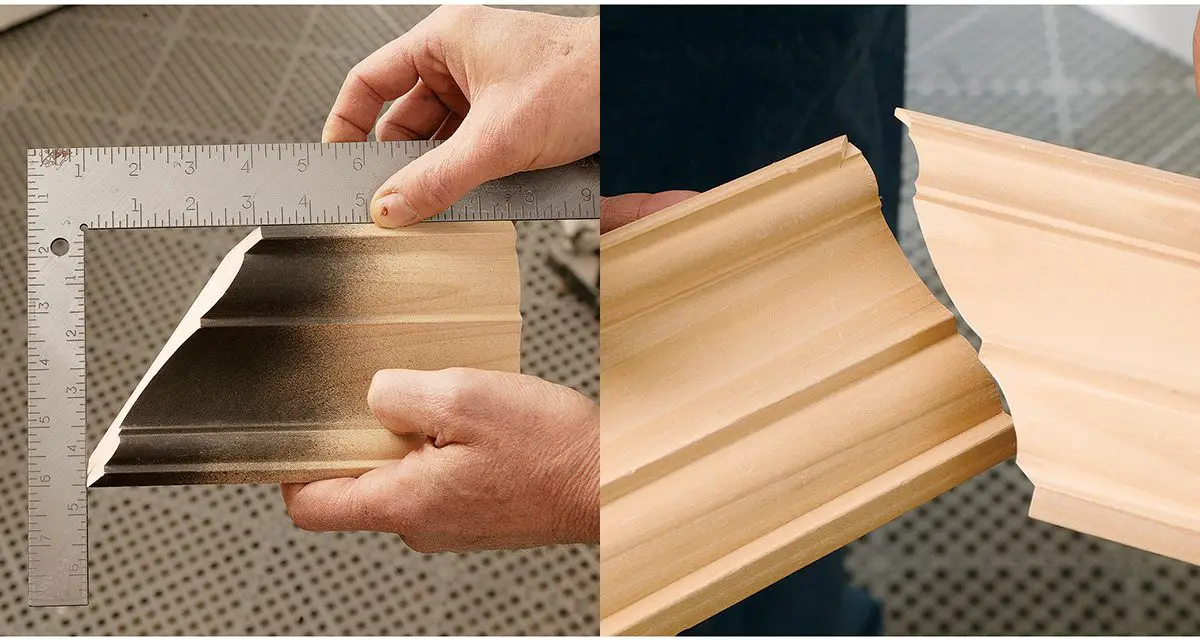
To cope with crown molding with a miter saw, follow these steps: measure and mark the length of the molding, set the miter saw to the correct angle, position the molding upside down on the miter saw, make the first cut using the miter setting, flip the molding over, and make the second cut using the bevel setting. Coped crown molding creates a clean and seamless joint when installed in corners.
By using a miter saw, you can accurately and easily cope with crown molding for your home improvement projects. It is an essential technique for achieving professional-looking results with crown molding installations.
1. Understanding Crown Molding Basics
Understanding Crown Molding Basics is crucial when learning how to cope with crown molding with a miter saw. One important aspect to consider is the types of crown molding materials available. Different materials have varying durability and aesthetic qualities. Accurate measurements are also vital for achieving seamless coped joints.
Make sure to measure properly to ensure a precise fit. Using a miter saw to cut crown molding requires careful attention to detail. By following the correct techniques and utilizing the right tools, you can achieve professional-looking results. Remember to practice caution and take your time when working with a miter saw to cope with crown molding effectively.
2. Choosing The Right Miter Saw For Crown Molding
When it comes to coping crown molding with a miter saw, choosing the right tool is crucial. Consider the saw’s capacity and features to ensure it can handle the task effectively. Additionally, using a recommended miter saw blade for clean cuts is essential.
By selecting the right blade, you can achieve precise and professional-looking results. The spring angle of the molding should also be taken into consideration, as it will affect the cutting and coping process. Lastly, when installing crown molding, pay special attention to the inside corners and make sure to create a coped joint for a seamless and professional finish.
By following these guidelines, you can successfully cope with crown molding with a miter saw and achieve beautiful results.
3. Preparing Crown Molding For Coped Joints
To prepare crown molding for coped joints, start by measuring and marking the molding for coping. Ensure that the molding is properly secured before cutting. Use a miter saw to carefully cut the molding, paying attention to the spring angle and corner crown.
Inside corners should be coped for a clean and seamless joint. It’s important to cut the molding flat against the saw’s fence to maintain accuracy. Trim any excess material to achieve a perfect fit. Coped joints provide an attractive finish for crown molding installations, creating a professional and polished look.
With the right technique and proper measurements, you can easily cope with crown molding using a miter saw.
4. Mastering The Cope Cut Technique With A Miter Saw
When it comes to coping crown molding with a miter saw, mastering the cope cut technique is essential. In this blog post, we will provide a step-by-step guide to help you achieve smooth and precise coped joints. Firstly, make sure to understand the spring angle and molding inside and outside corners.
Next, measure and mark the molding for the cope cut. Use a miter saw to make angled cuts along the marked lines. Then, carefully remove the waste material using a coping saw, following the contour of the profile. Sand down any rough edges for a seamless fit.
Finally, test the coped joint by dry-fitting the pieces together before installation. With these tips and techniques, you’ll be able to cope with crown molding like a pro.
5. Finishing And Installing Coped Crown Molding
Securing the coped crown molding to the wall or ceiling is essential for achieving a professional finish. To ensure a seamless appearance, sand the coped joints using fine-grit sandpaper. This will smooth out any rough edges or imperfections. Once the sanding is complete, apply a coat of paint or finish that matches the molding and the surrounding area.
This will help blend the coped joints with the rest of the crown molding. Make sure to use a brush or roller that is appropriate for the type of paint or finish you are using. Take your time during the installation process to ensure that the coped crown molding is securely attached and aligned correctly.
By following these steps, you can achieve a flawless look with your coped crown molding installation.

Credit: www.amazon.com
Frequently Asked Questions On How To Cope Crown Molding With Miter Saw?
What Is The Best Way To Cope Crown Molding?
Refer to coping crown molding with a miter saw as the best way to achieve precise and clean corners. Coped joints provide a seamless and professional finish. Coping involves cutting away the back of the molding to fit it over the profile of the adjacent piece.
This method is recommended for inside corners where walls are not perfectly square. To cope with crown molding with a miter saw, follow these steps: 1. Measure and cut the molding at a 45-degree angle using a miter saw. 2. Use a coping saw to cut along the contour of the profile on the backside of the molding.
3. Smooth the edges with sandpaper or a file. 4. Test the fit of the coped piece against the adjacent piece to ensure a snug fit. 5. Apply adhesive to the coped joint and secure the molding in place. By coping crown molding with a miter saw, you can achieve professional-looking corners that seamlessly blend together for an elegant finish.
Is It Better To Cope Or Miter Crown Molding?
Prefer to cope crown molding rather than miter it. Coping involves cutting the end of one piece of molding to fit perfectly over the contour of another piece, resulting in a seamless joint. This technique helps create tight and precise inside corners, especially when dealing with walls that are not perfectly square.
On the other hand, mitering involves cutting the ends of two molding pieces at a 45-degree angle to form a corner joint. While it may seem easier and quicker, mitering can result in gapped or imperfect joints, especially when working with walls that are not perfectly straight.
Coping allows for better flexibility in adjusting for small variations in wall angles and helps achieve a more professional finish. Overall, coping crown molding is considered the superior technique for achieving seamless and high-quality results.
How Do You Cut A Coping Joint On Crown Molding?
To cut a coping joint on crown molding, follow these steps: 1. Measure the length of the crown molding and mark the desired angle on the back of the molding. 2. Set the miter saw at a 45-degree angle in the same direction as the marking.
3. Place the molding upside down on the saw table, aligning the bottom edge with the fence. 4. Hold the molding firmly and make the initial cut using the miter saw. 5. Use a coping saw to cut along the profile of the molding, following the contours of the design.
6. Sand the cut edge to smooth out any rough areas. 7. Test-fit the coping joint with the adjacent piece of molding to ensure a tight and seamless connection. 8. Repeat the process for any additional coping joints needed. By following these steps, you can achieve precise and professional-looking coping joints on crown molding.
Conclusion
Coping crown molding over mitering it. While mitering can be quicker and easier, coping provides a more seamless and professional finish. Coping involves cutting the end of one piece of molding to fit over the profile of the adjacent piece, ensuring a tight and precise joint.
This technique is especially useful for dealing with irregularities in walls and corners. Additionally, coping allows for easier adjustments during installation, as any minor discrepancies can be easily corrected. By choosing to cope crown molding with a miter saw, you are ensuring a high-quality and visually appealing result.
Remember to carefully measure and mark your cuts, and practice on scrap pieces before working on your final project. With a little patience and practice, you’ll be able to cope with crown molding like a pro.


