
To cut a taper on a table saw, follow these steps: Set the blade angle on the table saw to the desired taper angle. Use a tapering jig to guide the workpiece through the saw, maintaining a consistent angle throughout the cut.
Adjust the fence to control the width of the taper. Proceed with caution, ensuring that the workpiece is firmly secured and that all safety precautions are followed. When it’s time to cut a taper on a table saw, start by setting the blade angle to the desired taper angle.
Use a tapering jig to guide the workpiece through the saw, maintaining a consistent angle. Adjust the fence to control the width of the taper. It’s important to exercise caution and prioritize safety while cutting tapers on a table saw.
Introduction To Taper Cuts
A taper cut is a technique used to create an angled edge on a piece of wood using a table saw. It involves gradually reducing the width of the wood from one end to the other. Taper cuts are commonly used in woodworking projects to create decorative elements, such as tapered table legs or chair spindles.
They can also be used to create precise and tight-fitting joints. Taper cuts are important because they allow woodworkers to add visual interest and complexity to their projects. Additionally, taper cuts can help improve the overall stability and balance of a piece of furniture.
By learning how to cut a taper on a table saw, you can enhance your woodworking skills and create stunning pieces of furniture or decorative items.
Tools And Materials Needed
To cut a taper on a table saw, you will need a few tools and materials. First, make sure you have a table saw, which is essential for this process. Additionally, you will need a tapering jig, which will help guide the wood as you cut the taper.
This jig ensures precision and safety during the cutting process. Lastly, don’t forget to wear the necessary safety equipment, such as safety goggles and gloves, to protect yourself from any potential accidents. By following these guidelines and having the right tools, you can easily cut a taper on a table saw for your woodworking projects.
Setting Up The Table Saw
To cut a taper on a table saw, you need to set up the saw correctly. Start by adjusting the blade angle to the desired taper angle. This can typically be done by loosening the blade tilt lock and rotating the blade to the desired angle.
Make sure the fence is parallel to the blade to ensure a straight and accurate cut. You can use a tape measure or a specialized tool to check the alignment. Adjust the fence position if needed. Once everything is set up properly, you can proceed to cut the taper on your workpiece by guiding it along the fence while pushing it through the blade.
Always remember to prioritize safety and wear appropriate protective gear when operating a table saw.
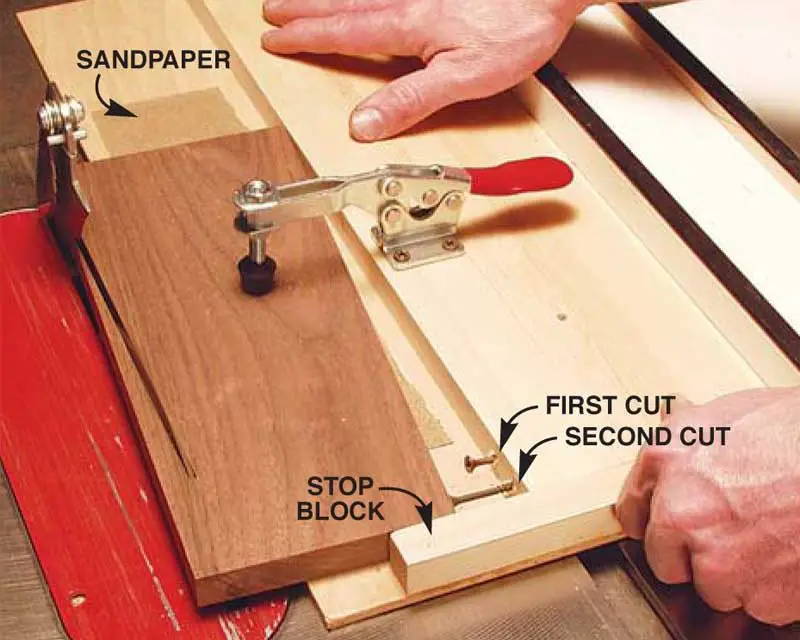
Using A Tapering Jig
Installing the tapering jig on the table saw is the first step in cutting a taper. Ensure the jig is securely attached to the saw’s fence, aligning it parallel to the blade. Positioning the workpiece on the jig is crucial for an accurate taper cut.
Place one end of the workpiece against the jig’s stop block, making sure it is firmly pressed against it. Gradually feed the workpiece into the blade, maintaining a steady and even pressure. Keep both hands on the workpiece, guiding it through the cut.
Remember to use push sticks or featherboards for added safety. By following these steps, you can easily cut a taper on a table saw using a tapering jig.
Making The Taper Cut
To make a taper cut on a table saw, it is important to feed the workpiece slowly and steadily. This ensures precision and accuracy throughout the cut. By maintaining control and stability, you can avoid any potential risks or mistakes.
Keep the workpiece firmly against the fence and guide it smoothly through the saw blade. Take your time and don’t rush the process. Remember, the key is to maintain a consistent and controlled feed rate. This will result in a clean and smooth taper cut that meets your desired specifications.
Practice and patience are the keys to mastering this technique on a table saw.
Credit: www.rockler.com
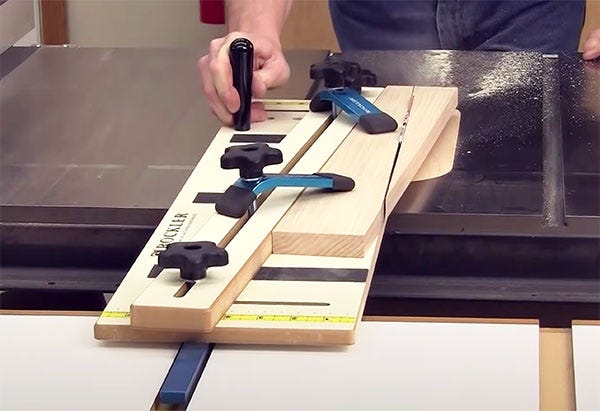
Creating Multiple Tapers – Double Taper
Creating multiple tapers on a table saw can be achieved with the double taper technique. One important aspect of this technique is adjusting the tapering jig to accommodate the desired double taper cuts. By carefully setting up and aligning the jig, you can ensure precise and symmetrical cuts.
The tapering jig acts as a guide, allowing you to control the angle and depth of the taper. Take the time to measure and mark the desired taper dimensions on your workpiece before making the cuts. It’s crucial to make sure the workpiece is firmly secured to the jig and the table saw fence to ensure safe and accurate cuts.
With the proper setup and technique, you can achieve professional-looking double tapers on your table saw.
Troubleshooting And Tips
To cut a taper on a table saw, there are some common issues you may encounter and ways to solve them. One issue may be the wood binding against the saw blade, causing it to stall. To solve this, ensure that the wood is properly supported and use a push stick to guide it through the cut.
Another issue may be tear-out or splintering on the edge of the taper. To prevent this, use a sharp blade and make sure your fence is properly aligned. Additionally, if the taper doesn’t come out as desired, you can make adjustments to the angle of the table saw blade or the positioning of the fence.
By following these troubleshooting tips, you can achieve perfect and accurate taper cuts on your table saw.
Finishing And Sanding The Tapered Piece
To achieve a smooth and polished finish on a tapered piece cut with a table saw, it is important to address any saw marks and imperfections. Begin by using a sanding block or sandpaper to sand the tapered edges, removing any rough spots or unevenness.
Gradually work your way through different grits of sandpaper, starting with a coarse grit and moving to finer grits for a smoother finish. Once the piece has been sanded to your satisfaction, wipe it clean to remove any dust or debris.
Next, consider applying finishes to enhance the final appearance. Whether you choose to stain, paint, or varnish the piece, it is essential to follow the manufacturer’s instructions and apply the finishes evenly using a brush or cloth. Allow the finishes to dry completely before handling or further work on the tapered piece.
Frequently Asked Questions On How To Cut A Taper On A Table Saw?
How Do You Cut Wood On A Table Saw Taper?
To cut wood on a table saw taper, follow these steps: 1. Set your table saw blade at an angle to create the desired taper. 2. Use a tapering jig or guide to hold the wood securely and guide it through the saw.
3. Slowly push the wood through the saw, maintaining a steady and even feed rate. 4. Repeat the process for each piece of wood, adjusting the angle and jig as needed for different tapers.
How Do You Make A Tapered Leg On A Table Saw?
To make a tapered leg on a table saw without a jig, follow these steps: 1. Set the table saw blade angle according to the desired taper angle. 2. Adjust the fence to the desired width of the tapered leg. 3.
Place the leg stock flat on the table saw, with one face against the fence. 4. Push the leg stock slowly and steadily through the blade, keeping it firmly against the fence. 5. Repeat the process for all sides of the leg until the desired taper is achieved.
Note: Always prioritize safety and wear appropriate protective gear when using power tools.
How Do You Use A Taper Jig On A Table Saw?
To use a taper jig on a table saw, follow these steps: 1. Attach the taper jig to the table saw’s fence securely. 2. Adjust the angle and width settings on the jig to achieve the desired taper. 3. Position the workpiece against the jig’s guide.
4. Turn on the table saw and slowly feed the workpiece through the blade, keeping it pressed against the guide, and maintaining a steady movement. 5. Continue cutting until the desired taper is achieved. Remember to prioritize safety and wear appropriate protective gear when using a table saw.
How Do You Make A Taper Jig For A Table Saw?
To make a taper jig for a table saw, follow these steps: 1. Cut a rectangular piece of plywood with one straight edge. 2. Mark a reference line on the jig to align with the table saw’s fence. 3. Attach a stop block on the jig to control the taper angle.
4. Secure the workpiece against the stop block and guide it along the jig while cutting the taper.
Conclusion
To cut a taper on a table saw without using a jig, follow these steps. First, mark the desired taper on your workpiece. Then, set the table saw blade to the desired angle by loosening the bevel lock and adjusting the tilt of the blade.
Next, set the fence to the correct distance from the blade. Use a push stick to guide the workpiece through the cut, ensuring your hands stay a safe distance away from the blade. Make slow, steady passes to gradually remove material and create the taper.
Remember to always wear appropriate safety gear, including safety glasses and hearing protection. By following these steps, you can confidently cut a taper on a table saw without the need for a jig. Whether you’re working on a DIY project or a professional woodworking endeavor, mastering this technique opens up a world of possibilities for creating customized tapered cuts.
So go ahead and tackle those taper cuts with confidence and precision!


