
To put a blade on a Ryobi circular saw, follow these steps: Firstly, unplug the saw for safety. Then, locate the blade lock button on the saw and depress it to lock the blade in place.
Next, use a wrench to loosen the blade nut in a counterclockwise direction. Remove the old blade and place the new blade onto the arbor, aligning the blade teeth with the direction of rotation indicated on the saw. Tighten the blade nut in a clockwise direction, ensuring it is securely fastened.
Lastly, release the blade lock button and plug the saw back in. Always refer to the user manual for specific instructions. Introducing the process of putting a blade on a Ryobi circular saw is important for those who want to use the tool effectively and safely. Whether you are a professional carpenter or a DIY enthusiast, being able to change the blade correctly is essential.
By following a few simple steps, you can effortlessly replace the blade on your Ryobi circular saw and ensure the efficiency and accuracy of your cutting projects. This guide will walk you through the process of securely attaching a new blade, ensuring your saw is ready for optimal performance. Keep reading to discover the step-by-step instructions for changing your circular saw blade.
Choosing The Right Blade For Your Ryobi Circular Saw
Choosing the right blade for your Ryobi circular saw is essential for optimal performance. Here’s a simple step-by-step guide on how to put the blade on your Ryobi circular saw, ensuring safety and efficiency in your woodworking projects.
When it comes to using a Ryobi circular saw, selecting the appropriate blade is crucial for achieving high-quality and precise cuts. Different materials require different blades, so understanding the options available and the factors to consider will help you make the best choice.
In this section, we will explore the different types of blades for various materials and discuss considerations for blade size and teeth count.
Different Types Of Blades For Different Materials:
- Rip-cut blades: These blades have fewer teeth and are ideal for cutting along the grain of the wood. They remove material quickly but may produce rough edges.
- Crosscut blades: With more teeth and a higher tooth angle, crosscut blades provide smoother and cleaner cuts across the wood grain.
- Combination blades: Designed for both rip cuts and crosscuts, these blades strike a balance between speed and quality.
- Plywood blades: These blades have a high tooth count and are specifically designed to prevent splintering when cutting plywood or other composite materials.
- Masonry blades: If you need to cut through brick, concrete, or other masonry materials, masonry blades with diamond or carbide-tipped teeth are necessary.
- Metal-cutting blades: For cutting metal or non-ferrous materials like aluminum, metal-cutting blades with fine teeth and a high tooth count are recommended.
Considerations for blade size and teeth count:
- Blade size: Ryobi circular saws typically support 7 1/4-inch blades, but it is essential to check the manufacturer’s specifications. Smaller blades may limit the depth of cut, while larger blades may put a strain on the saw’s motor.
- Teeth count: Higher teeth count blades provide smoother and cleaner cuts, while lower teeth count blades remove material more quickly. Consider the nature of your project and the desired finish to determine the appropriate teeth count.
By choosing the right blade for your Ryobi circular saw, you can ensure optimal performance and achieve professional-looking results. Whether you are working with wood, plywood, masonry, or metal, understanding the different blade options available and considering factors like blade size and teeth count will help you make an informed decision.
Remember, using the appropriate blade is key to achieving precise and high-quality cuts.
Safety Precautions Before Changing The Blade
Before changing the blade on your Ryobi circular saw, it is crucial to prioritize safety precautions. Follow these guidelines to ensure a safe and efficient process.
Before you start changing the blade on your Ryobi Circular Saw, it is essential to prioritize safety. By following these precautions, you can ensure a safe and accident-free blade replacement process:
- Disconnect the saw from the power source:
- Unplug the saw from the power outlet or remove the battery to eliminate any risk of accidental activation.
- Ensure the switch is in the off position and the saw is not running before proceeding with the blade replacement.
- Use protective gear:
- Wear gloves to protect your hands from sharp edges and potential injuries.
- Put on a pair of goggles or safety glasses to shield your eyes from any flying debris or sparks.
- Consider wearing ear protection if the saw is particularly loud to prevent hearing damage.
- Clear the work area:
- Before starting, make sure the work area is clean and clutter-free.
- Remove any obstacles or debris that may interfere with the process or cause accidents.
- Ensure proper lighting to have good visibility during the blade replacement.
- Read the manual:
- Consult the manufacturer’s manual specific to your Ryobi Circular Saw model.
- Familiarize yourself with the manufacturer’s instructions and guidelines for changing the blade.
- Pay attention to any unique features or requirements of your particular saw.
- Ensure the saw is secure:
- Place the saw on a stable and flat surface, such as a workbench.
- For cordless saws, remove the battery pack to reduce the risk of accidental starts.
- If possible, secure the saw in a vise to prevent any unexpected movement during the blade replacement.
Remember, safety should always be your top priority when working with power tools. By taking these precautions before changing the blade on your Ryobi Circular Saw, you can minimize the risk of accidents and ensure a safe working environment. Stay tuned for the next section, where we will guide you step-by-step on how to put the blade on your Ryobi Circular Saw.
Important Note:
Ensure you have the required tools and a replacement blade suitable for your Ryobi Circular Saw before beginning the blade replacement process.
Step-By-Step Guide To Putting A Blade On Ryobi Circular Saw
Learn how to easily put a blade on your Ryobi Circular Saw with this step-by-step guide. Follow these simple instructions to ensure a smooth and safe installation process for optimal performance.
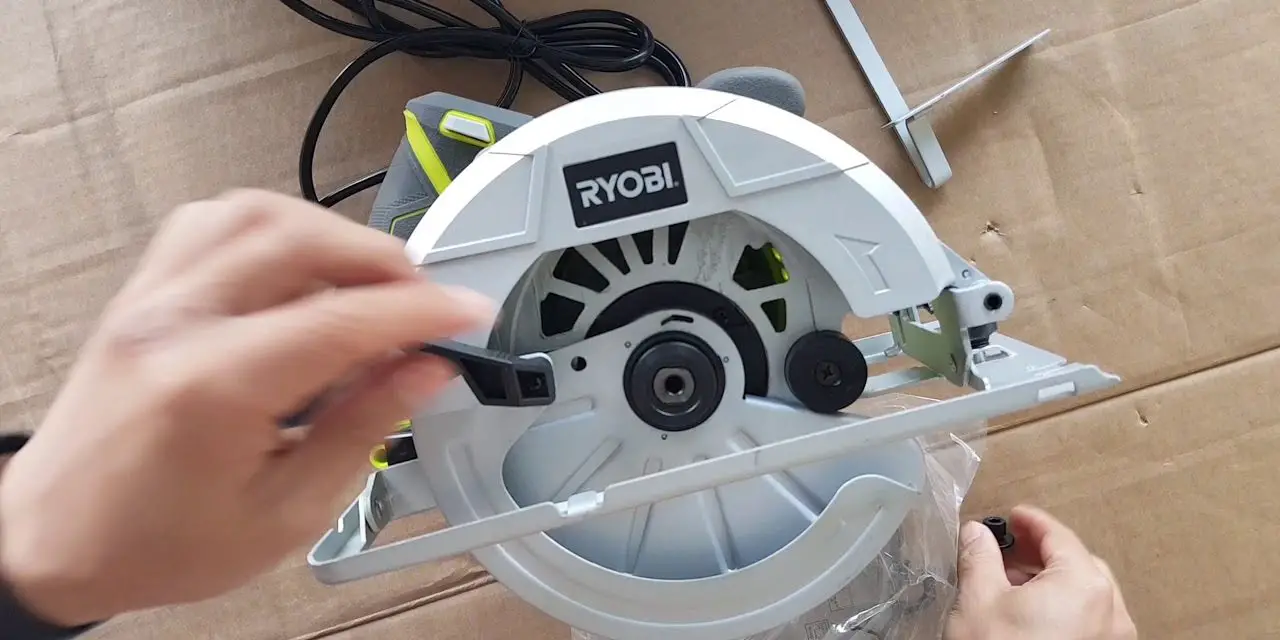
Locating The Blade Release Button
- The blade release button is a crucial component for replacing the blade on your Ryobi circular saw. It is located on the upper section of the saw, near the blade.
- To locate the blade release button, look for a small, spring-loaded button or lever that is usually marked with a blade symbol or the word “release.” It is designed to securely hold the blade in place or allow for its removal.
Removing The Old Blade
- Before removing the old blade, ensure that the saw is unplugged or the battery is disconnected to prevent any accidental starts.
- Locate the blade lock, commonly found near the blade release button. Engage or activate the lock to prevent the blade from spinning during the removal process.
- With the lock engaged, use a wrench that fits the arbor nut (usually included with your circular saw) to loosen the arbor nut in a counterclockwise direction.
- Once the arbor nut is loose, carefully remove it along with the blade. Be cautious as the blade may still have some residual tension.
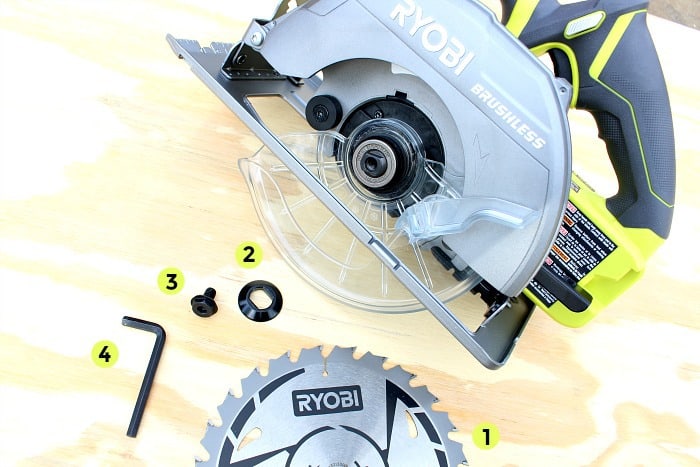
Installing The New Blade Correctly
- Prior to installing the new blade, ensure it matches the specifications of your Ryobi circular saw, including the correct size and tooth configuration.
- Check the blade for any signs of damage or wear. If it appears damaged, do not use it; instead, replace it with a new one.
- Align the hole at the center of the blade with the arbor on the saw, ensuring that the teeth of the blade are facing in the correct direction for the desired cutting action.
- Place the new blade onto the arbor, taking care to fully seat it onto the arbor and ensuring that it is centered.
- Rotate the blade slightly to make sure it spins freely without any obstructions.
Securing The Blade With The Arbor Nut
- With the new blade properly aligned and seated on the arbor, secure it in place by tightening the arbor nut in a clockwise direction.
- Use the wrench to firmly tighten the arbor nut, ensuring that it is snug but not overly tightened. This will help prevent unnecessary wobbling or movement of the blade during operation.
- Double-check that the blade is securely fastened by gently trying to rotate it. If there is any significant movement, re-tighten the arbor nut until the blade is firmly in place.
- Avoid overtightening the arbor nut as this can cause damage to the blade or hinder its performance.
- Once the blade is securely installed, you are ready to use your Ryobi circular saw for your cutting tasks. Remember to always follow safety guidelines and wear appropriate protective gear.
Now that you have a step-by-step guide to putting a blade on your Ryobi circular saw, you can effectively replace the blade whenever necessary. Remember to prioritize safety throughout the process and enjoy the improved cutting performance with your newly installed blade.
Testing The Blade And Adjusting Cutting Depth
To put a blade on your Ryobi circular saw, it’s important to test the blade and adjust the cutting depth. Carefully follow the steps to ensure proper installation and optimal performance.
When it comes to using your Ryobi circular saw, it’s important to ensure that the blade is properly installed and the cutting depth is adjusted correctly. By following these steps, you’ll be ready to make precise cuts in no time.
Let’s dive in!
Reconnecting The Saw To Power Source
Before testing the blade and adjusting the cutting depth, make sure that the saw is safely disconnected from the power source. Follow these steps to reconnect it:
- Position the saw near an outlet or an extension cord.
- Carefully align the plug with the receptacle and insert it.
- Push the plug in until it’s securely connected.
- Ensure that the cord is not tangled or obstructing your work area.
Checking The Blade For Proper Installation
Properly installing the blade is crucial for safety and performance. Here’s how to check if the blade is installed correctly:
- Make sure the saw is disconnected from the power source.
- Inspect the blade for any signs of damage or wear.
- Verify that the blade is securely tightened onto the saw’s arbor. Avoid overtightening, as it may cause damage.
- Ensure that the teeth of the blade are facing in the right direction. Typically, they should be pointing forward.
- Gently rotate the blade by hand to ensure it spins freely and doesn’t wobble.
Adjusting The Cutting Depth As Needed
Adjusting the cutting depth allows you to control how deep the saw cuts into the material. Follow these steps to adjust the cutting depth:
- Locate the cutting depth adjustment lever or knob on your Ryobi circular saw. It is usually located at the front or side of the saw.
- Loosen or release the cutting depth adjustment mechanism. This may involve turning the knob counterclockwise or pushing a lever.
- Slide the saw’s baseplate up or down to adjust the cutting depth as desired.
- Once you have set the desired cutting depth, tighten the adjustment mechanism to secure the baseplate in place.
- Test the cutting depth by making a cautious test cut on a scrap piece of material. Adjust as needed to achieve the desired result.
By reconnecting the saw to the power source, checking the blade for proper installation, and adjusting the cutting depth as needed, you can ensure safe and accurate cuts with your Ryobi circular saw. Remember to always prioritize safety and follow the manufacturer’s instructions for your specific model.
Happy cutting!
Credit: jaimecostiglio.com
Frequently Asked Questions Of How To Put Blade On Ryobi Circular Saw?
How Do You Attach A Ryobi Blade?
Attaching a Ryobi blade is a simple process. First, ensure the power tool is turned off and unplugged for safety. Then, locate the blade clamp release button. Depress the button to release the blade clamp. With the clamp open, carefully insert the blade into the blade holder, aligning the mounting holes.
Once inserted, release the blade clamp, ensuring it securely holds the blade in place. Give the blade a gentle tug to confirm it is properly attached. Finally, plug in the power tool, and you’re ready to go. Remember to always follow safety precautions when handling power tools, and consult the user manual for specific instructions for your Ryobi model.
Enjoy your woodworking or DIY projects with your newly attached Ryobi blade.
How Do You Put The Blade On A Ryobi 7 1 4 Circular Saw?
To put the blade on a Ryobi 7 1/4 circular saw, follow these steps: 1. Unplug the saw for safety. 2. Locate the blade lock button on the saw’s housing. 3. Push and hold the blade lock button to lock the blade in place.
4. Use a wrench to loosen the arbor nut by turning it counterclockwise. 5. Remove the old blade and insert the new one, making sure it aligns with the arbor. 6. Use the wrench to tighten the arbor nut securely by turning it clockwise.
7. Release the blade lock button. 8. Plug in the circular saw and test the new blade before using it. Remember, safety is important when changing the blade, always wear protective gear like gloves and safety glasses.
How Do You Put A Blade On A Circular Saw?
To put a blade on a circular saw, follow these steps carefully: 1. Unplug the saw to ensure your safety. 2. Locate the arbor bolt at the center of the blade and loosen it using a wrench. 3. Remove the old blade by sliding it off the arbor.
4. Align the new blade with the arbor, ensuring that the teeth face in the right direction. 5. Tighten the arbor bolt securely with the wrench. 6. Verify that the blade is properly aligned and balanced. 7. Plug in the saw, and you’re ready to use it with the new blade.
Remember to handle blades with caution and always wear protective gear. Follow the manufacturer’s instructions for your specific circular saw model. Stay safe!
How Do You Put The Blade On A Ryobi Chop Saw?
To put the blade on a Ryobi chop saw, follow these steps: 1. Unplug the saw from the power source for safety. 2. Locate the blade arbor and loosen the arbor nut using a wrench. 3. Insert the new blade onto the arbor, making sure it aligns with the saw’s markings.
4. Tighten the arbor nut securely using the wrench. 5. Double-check that the blade is properly installed and centered. 6. Plug the chop saw back into the power source and ensure it is stable and secure. 7. Test the saw by making a few practice cuts before using it for your project.
By following these steps, you can easily and safely put the blade on your Ryobi chop saw. Remember to always prioritize safety and wear appropriate protective gear while operating power tools.
Conclusion
To safely and effectively put a blade on a Ryobi Circular Saw, it’s important to follow the steps outlined in this blog post. Remember to always refer to your user manual for specific instructions and safety guidelines. Start by unplugging the saw and removing the battery if applicable.
Next, retract the blade guard and use the blade locking button to keep the blade in place. Carefully remove the old blade by loosening the arbor nut and then attach the new blade, making sure it is properly aligned. Finally, tighten the arbor nut securely and release the blade lock button.
With these simple steps, you can confidently attach a blade to your Ryobi Circular Saw, allowing you to complete your projects efficiently and safely. So go ahead and put your new knowledge to use! Happy cutting!


